 Peter Founder
AdsPower Guide: How to Set Up Facebook Ad Account Environments
AdsPower
Hi, I’m Peter.
Another wave of BM bans hit recently, and several community members have been asking the same thing: the account is gone, can the environment still be used, and does it need to be rebuilt?
The trouble is, as soon as there’s any link between accounts, one going down easily drags a whole string down with it.
So the rebuild has to start from the environment. This time I’m using AdsPower to walk through my process for building one account environment from the beginning.
01 A clean environment: which layers that means
Broken down, there are three layers: browser fingerprint, exit IP, and cookies and cache.
If any one of the three is shared, the platform can link the accounts together.
The fingerprint browser handles the first and third layers, the proxy handles the second. In AdsPower, one environment is one complete configuration, and you set up all three layers together when you create it.
02 Building the environment: basic settings and account platform
First, click New Browser at the top left.
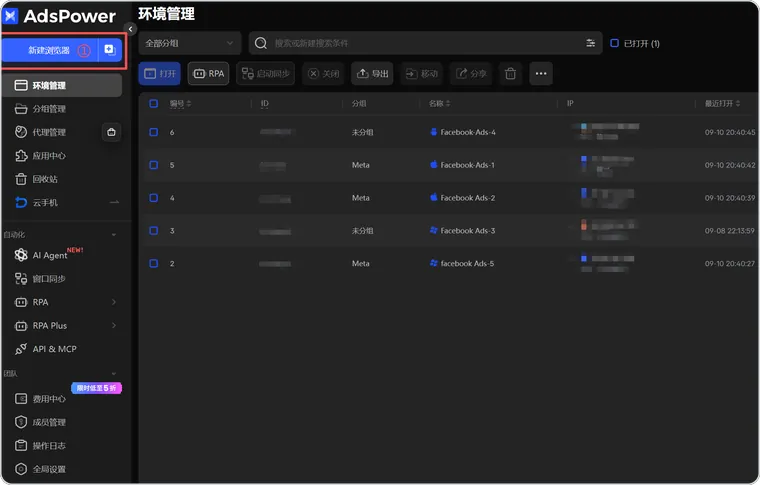
Environment management · New Browser
The configuration is split into five tabs: Basic settings, Proxy, Account platform, Fingerprint, Advanced settings.
Three fields in Basic settings need attention.
Name them by platform plus a number
Mine go Facebook Ads-1 to 5, so I can tell at a glance in the list which account is which.
Pick SunBrowser as the browser
It’s Chromium-based, currently on Chrome 147. Fully compatible with Chrome extensions; for FB, choose this one.
FlowerBrowser next to it is Firefox-based. Consider it when you want to diversify fingerprints.
Don’t use the same operating system for all of them
Windows, Mac, Linux, Android and iOS are all available, and once you choose, the User-Agent follows automatically, so you don’t have to piece it together yourself.
My accounts are a mix of Mac and Windows. The icons differ in the list, which is another way to tell them apart.
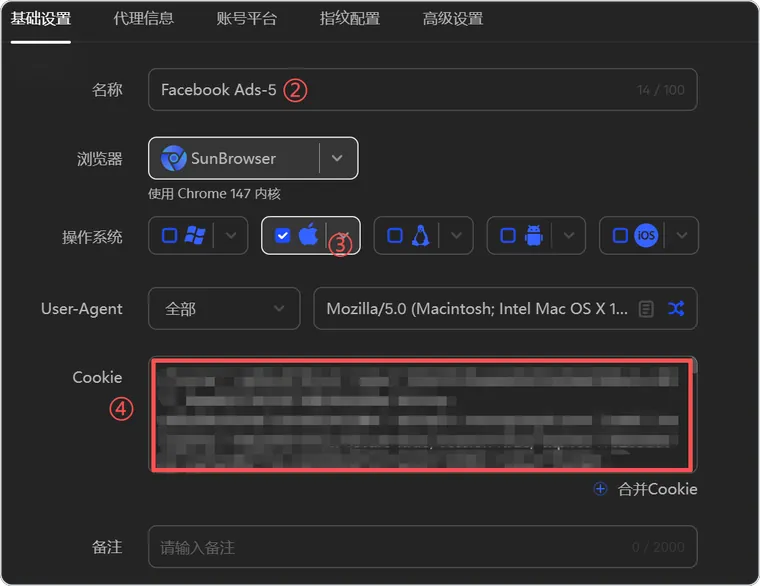
New Browser · Basic settings
Further down, the Account platform tab lets you store the platform, username and password, and 2FA key together.
When you launch, it carries the login details with it, and for 2FA you don’t need to dig out the authenticator separately. One environment can also hold several accounts.
In the tabs field at the bottom, enter facebook.com, and the browser opens straight onto the page you need.
03 Configuring the proxy: skip the manual typing
The proxy is in the second tab, with four options: Custom, Added proxies, Dynamic proxy, Integrated proxy.
Typing in host, port, username and password by hand is Custom. It’s fine with a few accounts; with many, it gets tedious.
I use Integrated proxy. Pick a connected proxy provider from the drop-down, and it produces a socks5 line right away, saving you that whole string of manual typing.
After filling it in, click Check proxy, and it shows the exit IP and its location. Don’t skip this step: if the proxy doesn’t work, everything you configure afterward is wasted.
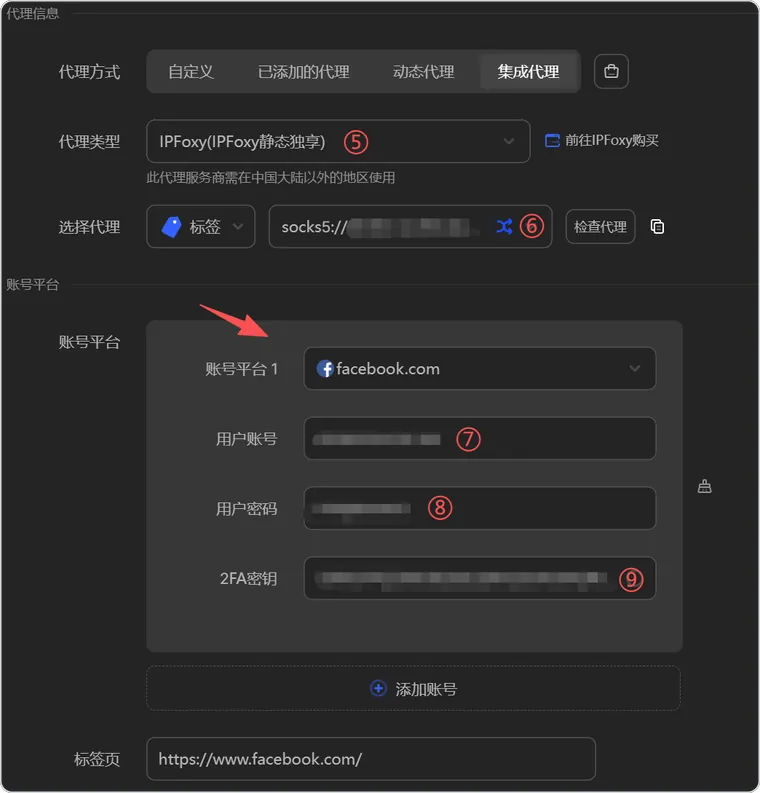
Proxy · Integrated proxy and account platform
For type, I recommend residential or ISP proxies for running FB.
Datacenter proxies are cheap, but FB is strict with that kind of IP, and they easily trigger verification. Whatever you save here, you’ll most likely pay back later in accounts.
04 Fingerprint settings: the three items based on IP
This page is where the whole process most deserves your time.
Set Time zone, Geolocation and Language all to Based on IP.
Once set, they follow the proxy: whichever country the line switches to, these three change with it automatically, so you don’t have to match them one by one by hand.
Manual configuration is where things go wrong most easily. If the IP is in the US but the time zone is UTC+8, the platform can see at a glance that something is off.
Set WebRTC to Disabled
WebRTC bypasses the proxy and exposes your real IP. If you don’t turn this off, however clean the proxy setup is, it leaks.
Leave hardware noise at the defaults
Canvas and WebGL image are off by default; AudioContext, ClientRects and the like are on by default. If you’re not sure, don’t touch them; the defaults have been tuned.
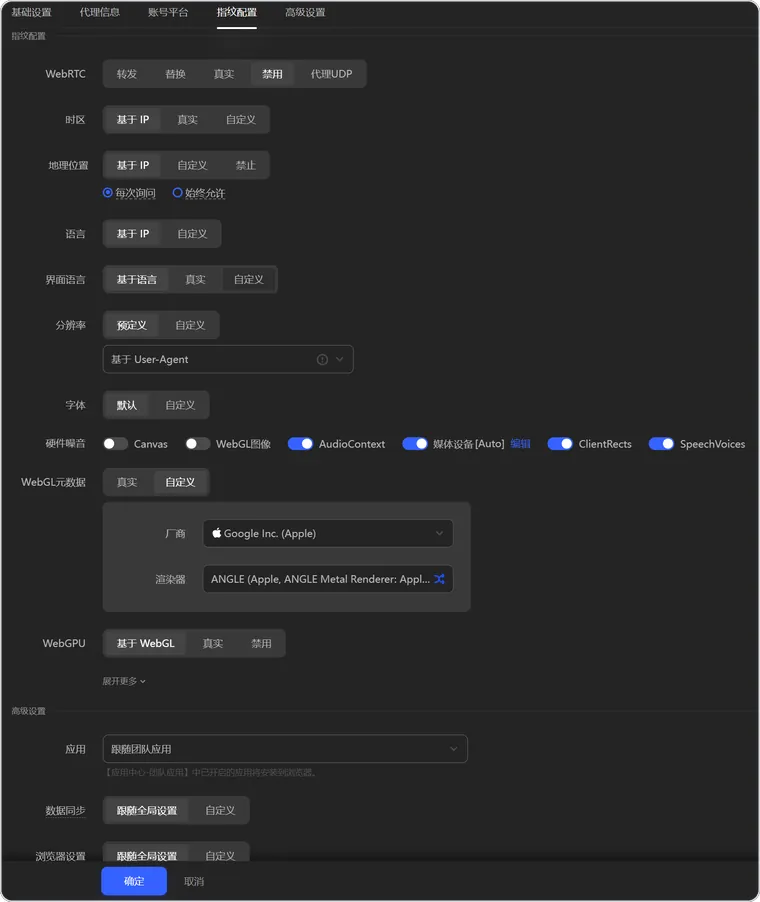
Fingerprint · Time zone and language follow the IP
Set WebGL metadata to Custom, and it fills in a vendor and renderer that match the operating system. Pick Mac and you get an Apple renderer; don’t change it to something that doesn’t match.
05 How to manage them once you have many accounts
With one account, you can build it however you like. Once you’re at five or ten, you have to rely on management.
Groups
After building an environment, assign it to a group on the list page: select it, then click Move. I group by platform, so everything running Meta goes in one group.
At the top of the list page you can filter by group, then open or close in bulk.
RPA
In the Automation section in the left sidebar, you build flows by drag and drop, no scripts to write.
I use it for account warm-up actions: open the home page, scroll a few screens, randomly click on two posts, stay a few seconds and then exit.
By hand, that’s five or six minutes per account; four or five accounts and you’ve spent half an hour. Record it once and save it, add random delays, run several accounts in parallel, and it’s done in a few minutes.
Every step in the editor is a visual node.
API and MCP
Creating, launching and closing environments can all go through the API, and even the free plan has a quota of 120 calls per minute.
There’s also an MCP hanging in the sidebar, which I’ve been looking at recently. Once connected, in theory it lets an AI open environments and run flows directly, without you clicking around in the back end. Still testing; if it works out, I’ll write it up separately.
06 Pricing and getting started
Free forever plan
- 2 environments, no credit card needed
- Sign up and you can start building
Paid plans
- Tiered by number of environments: 10 / 20 / 50 / 100 to choose from
- Quarterly billing is a little better than 10% off, and yearly billing is 50% off for a limited time
My suggested order. Use the two free environments to walk through the four steps above: build the environment, configure the proxy, align the fingerprint, check the proxy.
Log in with an account that doesn’t matter and watch it for a few days; once you’ve confirmed there are no problems, move the real accounts in. Record one RPA warm-up flow and keep it, so when a new account is set up later, you can apply it directly.
Don’t skimp on the proxy. You put real effort into configuring the environment; if the proxy drags it down, it’s all for nothing.
Direct sign-up link: adspower.net sign-up link
New articles and quick notes from Peter.