 Peter Founder
Airwallex AgentOS: My Digital Employee Takes On Finance Chores

Airwallex, Hong Kong company
Hi, I’m Peter.
I wrote earlier about Claude Cowork starting work as my first digital employee, beginning with reconciling my Hong Kong company’s accounts.
Today that digital employee gets another promotion: I’ve connected one of the company’s receiving accounts, Airwallex, directly to it.
This post records the whole thing: what Airwallex is, how to connect it, and what the employee can do once it’s connected.
Test note: everything here was tested in August 2026, on a Hong Kong company account and the version of Airwallex AgentOS available at the time. It’s still iterating fast, so treat the official docs as the source of truth for commands and capabilities.
The invoice, customer and amounts in this post all come from the sandbox. They’re only a demonstration of the process, not real transactions or tax documents.
01 What Airwallex is, how to sign up and how to use it
Airwallex is a cross-border payments and treasury platform. Once you’re set up you get a set of multi-currency receiving accounts (Global Accounts), with local account numbers for the major currencies: USD, EUR, HKD and so on.
Affiliate networks and ad platforms can pay straight into them. My Hong Kong company receives its network commissions and some ad top-ups through it.
You sign up as a company entity, entirely online on their website: submit the KYB documents (certificate of incorporation, director ID and so on), and once you pass review you’re good to go.
Opening the account is free; the cost is mainly in the usage fees.
Day-to-day use isn’t complicated either: open a receiving account in the right currency in the dashboard and give the account details to the network.
For example, opening a US USD account: pick the country, give it a nickname, done. It can receive ACH, Fedwire and international SWIFT:
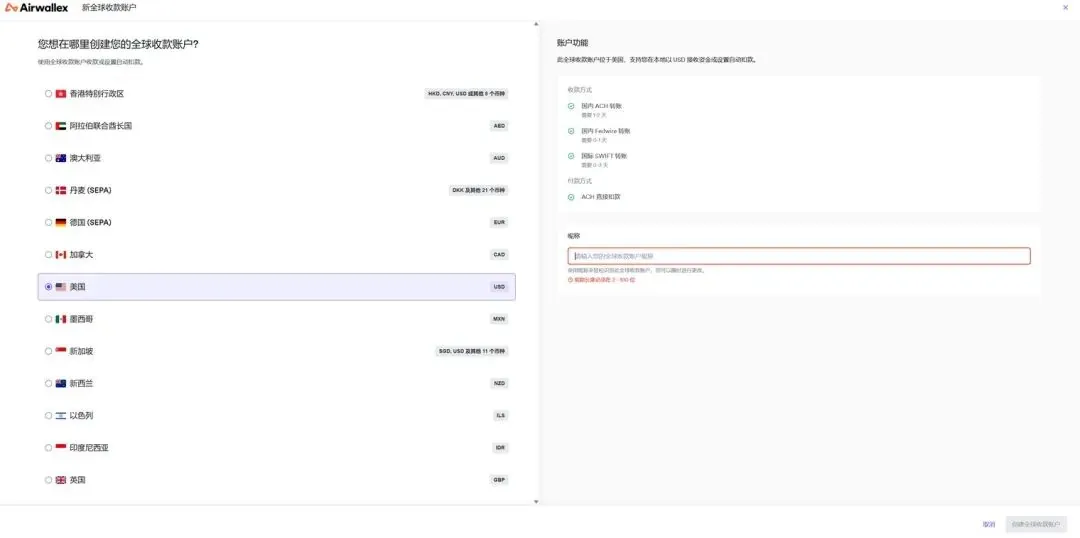
Creating a Global Account in the dashboard: pick a country, add a nickname, and the USD account is open
Once the money lands, outgoing payments and company card spending are all handled in the same dashboard.
For a one-person company, it basically is the finance department. So this upgrade amounts to sending my digital employee into the finance department.
02 Why do this at all
The most annoying part of a one-person company was never the business itself. It’s the chores around money: balances in several currencies to watch, network payouts to check one by one, statements for the bookkeeping to gather yourself.
None of this takes any skill, but every month it eats your time.
Last time I had Cowork do the reconciliation, it did the work, but I still had to export the statements from the dashboard first and feed them to it. The digital employee works, the boss fetches the data: not smooth enough.
Now Airwallex has turned this into an official product line called AgentOS. It’s not AI writing code to call the API for you; it’s the agent reading and writing your account resources directly, with one-click installs in the plugin marketplaces of Claude Code, Cowork and Cursor.
The launch blog post puts it bluntly: from now on you can use Airwallex without opening Airwallex. Inside whatever AI tool you work in, you direct the agent in natural language and it operates on your behalf.
Seeing that, I had no reason not to try it. Digital employee, time to go into the system and fetch your own data.
03 The ten-minute setup

Three steps in total, no code written at any point
Step 1: install the plugin from the terminal
claude plugin marketplace add https://github.com/airwallex/airwallex-marketplace
claude plugin install airwallex-agentos@airwallex-marketplace
Step 2: let it set up its own environment
Open a new session and paste the official opening line in as-is. Installing the CLI, configuring the environment, all of that it does by itself:
Set up Airwallex AgentOS for me. Fetch https://www.airwallex.com/docs/developer-tools/ai/agentos.md and follow the setup guide.
Step 3: click authorize in the browser
It automatically pops up the OAuth authorization page; log in with the company entity’s account. That authorization page is worth pausing on for a second. Read the permissions column on the right carefully:
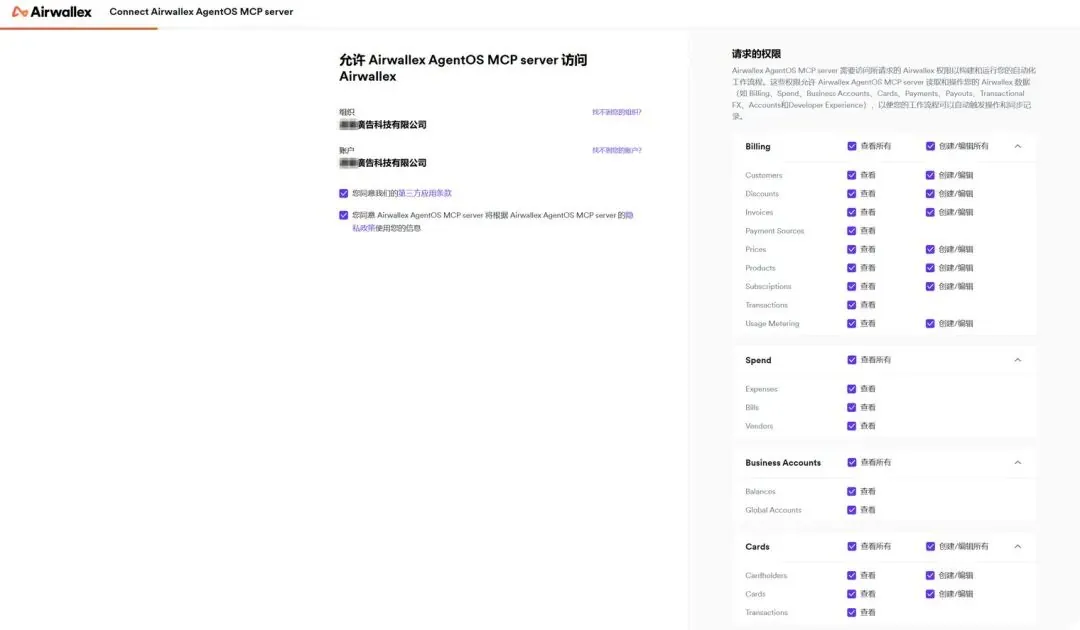
The AgentOS MCP permissions page: create/edit rights are concentrated on the receivables side; the parts that move money out are view-only
What it can create and edit is concentrated on the receivables and spend-management side: issuing invoices, creating customers, issuing cards, adding beneficiaries.
Actual movement of funds out (transfers, payments, FX conversion) is something the official Skills never execute on your behalf.
I went through the skill source code in the plugin. There’s a hard gate written in: as soon as words like transfer or payment show up in an instruction, the agent is required to refuse in its first sentence, and isn’t even allowed to call a query tool first. Write operations default to a dry-run first, showing you the full parameters, and only execute once you give the nod.
To be clear: this is the default policy at the official Skill layer, not an unbypassable hard lock on funds at the server side. So don’t turn on any auto-approve mode; that’s the only way this layer of protection actually works for you.
By the way, Cowork users have it even easier: no command line at all. Search for Airwallex under Settings → Extensions, and the official plugin installs together with its five finance skills when you click Add:
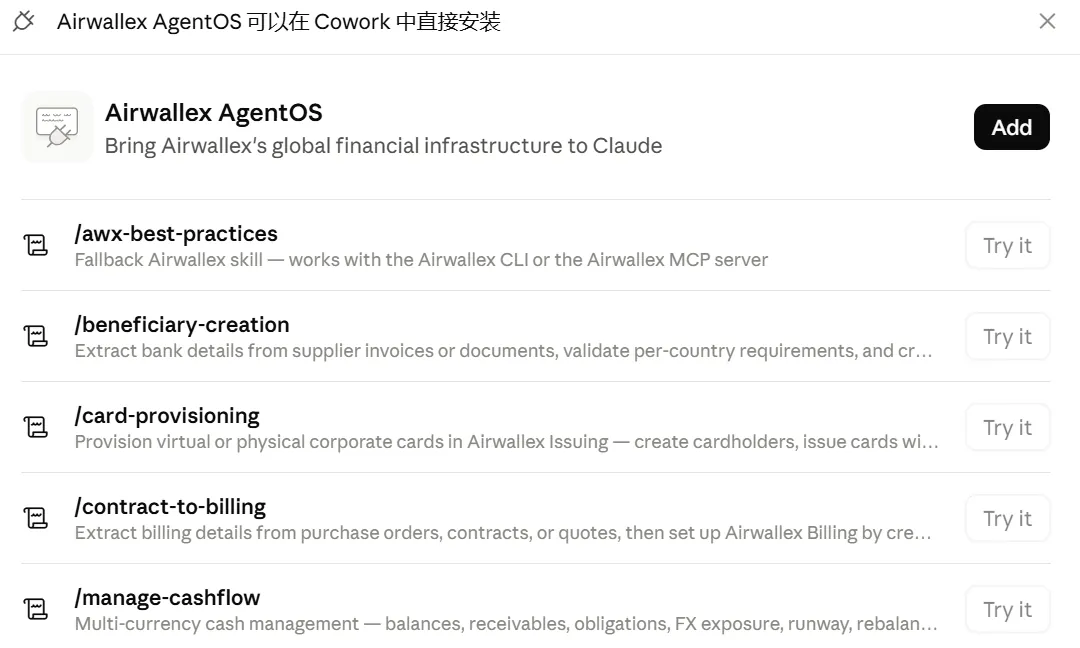
After installing, go to Connectors, connect the airwallex-agentos connector and run through OAuth once (careful not to pick Airwallex Developer, which only connects to the docs and the sandbox).
My first digital employee did its reconciliation in Cowork back then; now it can connect directly to the account there too.
Confirm the authorization, receive the confirmation email, and you’re connected. Ten minutes on the stopwatch for the whole thing, and I didn’t write a single line of code.
04 Once connected, what the upgraded digital employee can do

The whole chain: instructions in, data out; moving funds out still goes back to the dashboard
First: the monthly incoming payment check
Have it summarize the last 30 days of incoming payments by payer, then check the list against each network’s dashboard.
A dozen or so platforms, several currencies, dozens of payments: one round used to take the better part of half an hour at least. Now it’s one sentence and one minute, and it never misreads a line.
To be clear: what it gets is the real incoming payments on the Airwallex side; the numbers on the network side still have to come from your own dashboards. This is an operations-level payment check; reconciliation in the accounting sense is still the accountant’s job.
Second: issuing an invoice, one sentence
Sponsored posts and commission settlements often need an invoice to the other party. First, in the sandbox, I had it issue the invoice for last week’s $300 sponsored post.
One detail while creating the customer: I only gave it the name and the currency. It pointed out on its own that “AI Tool” sounds like a company, not an individual, marked the customer type as BUSINESS in the plan, and waited for my confirmation.
Then the invoice: it laid out the parameters and all four steps it would execute, and stated clearly that it wasn’t executing yet and was waiting for my confirmation:
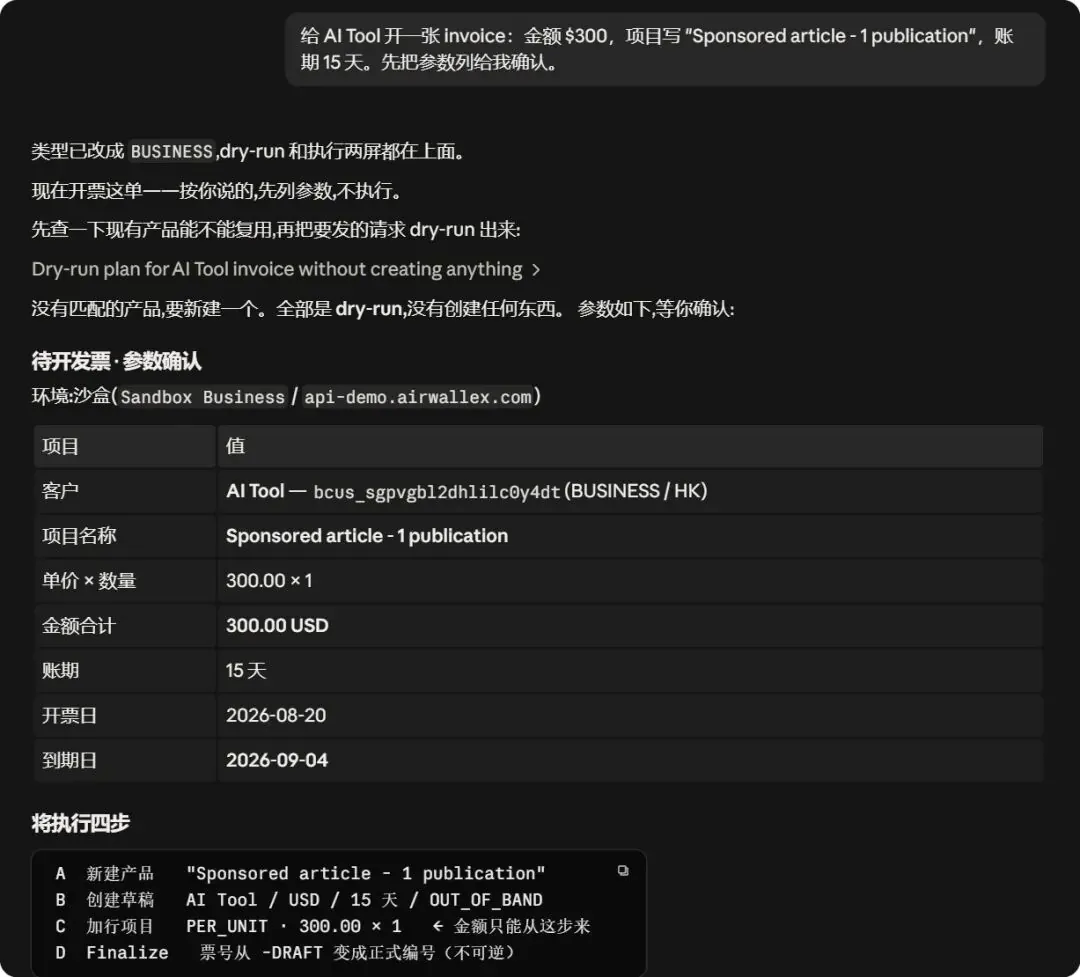
The dry-run before invoicing: parameters, the four-step plan, and even a heads-up that Finalize is irreversible
After I gave the nod, the four steps ran and a properly formatted invoice (commercial invoice) was generated straight away.
This sandbox one is only to validate the process; in the production environment, a PDF issued this way can go straight to the client:
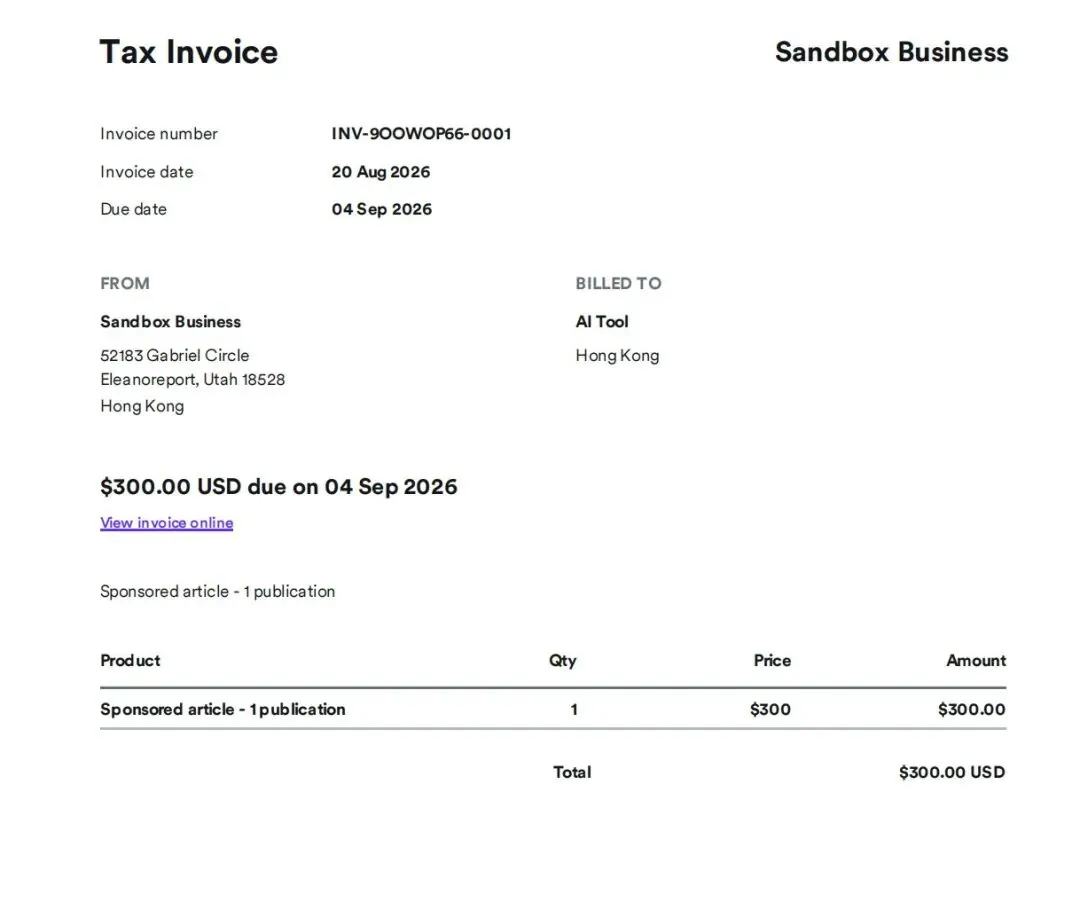
Sandbox process check: the invoice number went from DRAFT to final, with the billed-to name, amount and due date all in place (sandbox data, not a real transaction record)
Behind this is the official contract-to-billing skill. It can even read a contract or PO directly, pull out the amounts and terms itself, and turn them into an invoice and a subscription.
Remember the “create/edit” on the Billing → Invoices row of the authorization page above? That’s what it’s there for. Once the payment for an issued invoice lands, have it match and close the invoice against it: one closed loop.
Third: preparing the monthly statement pack for the accountant
One sentence at month end and the statements for every currency are summarized by month and exported; the material for the accountant is complete in passing. This used to be the chore I procrastinated on most; now it’s the prototype of a scheduled task.
The three together save me, at a rough count, the better part of a day each month, with fewer errors and omissions than when I checked by hand.
If you want its full boundaries, one table makes it clear:
| Tier | What it can do |
|---|---|
| Just ask (read-only) | Balances and cash position by currency, incoming payment details, receivables and payables, card spend, FX rates and currency exposure |
| Confirm before it runs (write) | Create invoices from contracts/POs, add beneficiaries, issue cards with limits; every step dry-runs first and shows the full parameters |
| Hard gate (refused on sight) | Transfers, payments and FX conversions are never executed on your behalf, and FX rates are reference only; accounting work like P&L and reconciliation reports is explicitly out of scope |
Checking multi-currency balances, looking at receivables and payables, preparing an FX plan for a payrun, turning a signed contract straight into bills and invoices, and even, provided tools like email and Slack are connected at the same time, having the agent bring the finished invoice into the conversation with the client and draft the wording for you. Whether it can send it directly depends on the permissions of the connector on that end.
Finance operations and communication tools strung into one line: that’s the shape an agent should have.
One detail I really like: it knows what it doesn’t know. Ask it for a proper reconciliation report or a P&L and it tells you straight out that this is out of scope, and that it can only give you the cash position and the details.
05 My take
A reminder for anyone who wants to try it: never put an agent connected to a real account into a multi-user environment. Whoever can message it is effectively holding your account permissions.
Airwallex has a separate sandbox environment, and logging in with the CLI without --prod defaults to it. Before you let the AI issue real invoices or create beneficiaries, run the whole process smoothly in the sandbox first, then switch to production.
And one official risk warning many people will skip past: untrusted documents and web pages are a source of “indirect prompt injection” risk for an agent. Every tool call it makes after reading external content is worth reviewing with your own eyes before you let it through.
New articles and quick notes from Peter.